Vintage Color

I’m really happy with the color of the vintage amber tint and the appearance of the logo underneath. I still need to build up some clearcoat to hide the edge a little more.

I realized that shooting something translucent in allot more difficult than an opaque color. There are a couple of spots where the color built up a little too much. I wet sanded the body with 600 grip paper. I applied too much water to the surface and the paint is swelling along the grain of one of the screw holes. I’m a little frustrated by this, but on a relic guitar isn’t that called “character”?

I stopped sanding for the day after consulting Google and finding that when this type of swelling occurs it’s easy to sand through the finish. I’m curious to see how this effects the finish in that area at the moisture dissipates, if it dissipates.

Here are some photos from the progress. I’m getting eager to see the guitar together so I placed the pick gaurd and hardware on top of the body.

Leap of Faith

I created my decal for the neck using an awesome technique from Bill Jehle at projectguitar.com creation and application went well. Here’s a quick recap and photos:

An inverse logo outline was laser printed on transparency film. I used a pilot gold gel pen to color in the logo. I then applies mod podge (matte) to protect the gel paint from the adhesive spray. I masked the headstock and shot spray adhesive to the headstock and logo. On my test logo the spray can propellant pushed the logo about a 1/2 inch an left a little residue on the top of the logo. I used the tip of tweezers to hold the logo down when I sprayed the second one. After waiting the recommended minute i used tweezers and placed the logo on the headstock. I rolled my finger across the surface to get rid of a few tiny air pockets. Most of the overspray on the headstock balled up and rubbed away as I rubber out the air pockets. After 5 minutes I used a drop of naptha on a paper towel to clean up the rest of the adhesive residue.

After an hour a shot my first coat of nitro (stew mac vintage amber) on the headstock and neck. I’m a little worried about a reaction with the sanding sealer, but following the advise of a fellow builder on guitar attack I tested on scrap and it worked fine.

I decided to post on the blog to kill time before my next coat of nitro.

Here are photos from the process:

Finished logo before the adhesive process

Layer of Mod Podge starting to dry

Trying to stay between the lines with the gold gel pen

OK a half hour is up, I got go check the finish and shoot another coat!

Relic is My Favorite Color

I know a lot of the folks disagree with the idea of a relic instrument. The battle scars should be earned and not applied with a razor blade. I collect antiques, I live in a house built in 1920. I love the patina of old stuff. New stuff makes me nervous. When I was 21 I spent my “life savings” to buy a 335 custom shop. It was a tobacco sunburst, and it was amazing, a flawless instrument. Every time I picked it up I was afraid I was going to scratch it. I felt relieved when I sold it a couple of years later. In comparison my favorite guitar is a 70s tele custom that’s was a disaster when I bought it. I never thought twice about laying into it and a scratch only adds character. Old stuff rocks.

3rd Can of Krylon

I got my third can of krylon on the body and I’m going to let it sit for a week or so before I wet sand.

In the interim I have the amp to work on. I got my brass stock in the mail today – gotta love amazon prime. Pics below show the progress I’ve made. I’ve shaped the oak plywood for the grill and cut the speaker mount to fit the philco radio case.

Brass Tarnishing Techniques

Scraps from the web on tarnishing brass, this is what I found with a quick search. Nothing here has been tested.

1. Choose a glass container with lid of sufficient size to contain the item requiring aging. Find some cotton wool and soak in ammonia and place in bottom of jar. Suspend brass item in jar and attach top. Brass item will tarnish fairly rapidly say 20 minutes depending on room temperature. Remove from time to time to check amount of aging required, then remove and neutralize ammonia with clean water.

2. You will think i am a freak for this, but bury it in the kitty litter box for a couple of days. Then wash well.(!) It will give a really interesting oxidized effect. (obviously i have way too much time on my hands)

3. You can repatina brass and bronze depending on the look you are after, simply, and at little expense. I use a closed container, bucket & lid, or whatever comes closest to fitting around the brass item. Polish and clean off any hand prints with paint thinner, wear gloves at this point. Locate a small jar and lid, place in this 1/8 cup of ammonia. Do this out doors with a breeze at your back. Masks and gogles are a bennefit with ammonia, but no mask will seperate amonia from the air you are breathing, so be warned. Next put the brass item in the container, put the small jar inside, remove the lid from the jar and cover the bucket. A clear container works well here, or else look inside from time to time to see how things are doing. Goggles help the peeking. Keep track of the time if you wish to repeat, and replace the ammonia with the same amount of fresh ammonia each batch. Next I take a polishing cloth, clean and very soft, buff the edges for highlights, spray with brass lacquer, or spray shellac. Some hobby shops are selling metal ageing chemicels that can give assorted colors, so if the ammonia isn’t the darkening you want, try them too.

4. Salt and Vinegar

Wear Your Respirator

My wife noticed a rash on my face at the edges of my goatee this morning. It was very red but I didn’t feel any irritation. On closer inspection the color is berry red, krylon berry red to exact. My respirator isn’t sealing very well, I have to snug up the straps.

Hmmm… I wonder what my lungs look like.

I think I’ll paint my next guitar a nice youthful brown to get rid of the grey in my beard. Anyone have any guitar finishing techniquest that will help with a bald spot?

Another Trip to the Hardware Store

I purchased a sheet of ¼ oak plywood, a pack of blades for my scroll saw, and some brass hardware for the amp build. I liberated some brown grill cloth from a pair of speakers sitting in the basement. I’ve started the layout to reinforce the radio case and mount the speaker. I also ebayed a set of jewel lamps, unfortunately I couldn’t find the vintage purple pilot light I had in the archives. I’m sure it will turn up as soon as the new ones arrive.

I’m very excited about creating the control plate for the amp. I posted on the telecaster.com forums and shared a site showing how to etch brass. I think a tarnished brass control plate will a custom etched graphic will be a perfect fit for the amp! Links here and here

I’m on my second can of krylon on the tele body and I’m getting ready to apply the headstock decal and start shooting clear coat on the neck.

Here’s a 10 minute 3D model of the amp mod:

Paydirt at Hamfest

I’m finding that the finishing work on the guitar requires allot of patience and I need another project to keep me busy so I don’t rush through the work and get sloppy.

I spent part of the weekend taking my grandfather-in-law to the Toledo Hamfest (Home and Mobile Radio, not honey baked) I’m not a ham, but I appreciate a good electronics themed flea market as much as the next guy. My mission was to find some hardware and a case to build a small amp to accompany the TC-10.

I got lucky and I found about everything I need to build a cool “vintage” looking amp – for $20!!!!

Here’s what I found:

philco radio with a great case $5.00 (haggled down from $10)

pignose hog 20 practice amp (not working until I replaced the fuse!) $10.00

3 bakelite knobs, vintage power switch and fuse holder $5.00

I cracked open the pignose, solved the fuse issue and found a suitable power supply. It came with a mismatched 15v laptop power brick. It sounds great for a ten dollar investment. I broke down the amp so it can be mounted in its new home. The hog 20 has the option of battery power and also has two 6v sealed lead acid batteries, I’m wondering if I can save weight and cost by using a NIMEM cells? A little research is in order.

Here are photos of the booty in all it’s vintage splendor:

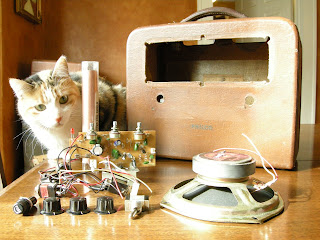
Philco case, pignose speaker and guts, knobs, switch, fuse holder, and pixel the cat.
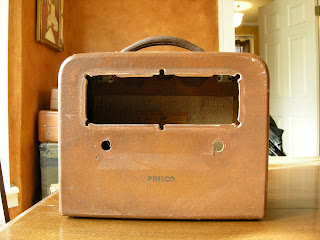
Philco detail front

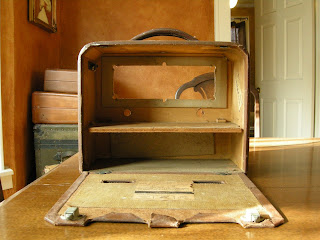
Philco detail back, the case has an awesome hinge and latch system.
hardware detail (click the image to view LARGE, the detail is great)


In addition to the amp stuff, I found a huge roll of copper foil $3, a shopping list of electronic components for other projects $40?, a trashed Victrola $10, a couple of cool vintage radios $20(decoration) and tron on laser disk $2(I’m a geek, I collect tron memorabilia)

I have a cool purple jewel lamp holder that I pulled from something a while ago that will look great on this project. I’ll have to find a suitable grill cloth and make a bezel of some sort, I think It will be a cool little amp when it’s finished.

Waiting for Paint to Dry

The color, valspar berry, is consistent across the body, the salmon appearance on top was caused by the light source.

I’m in the process of painting the body, I’m 5 coats in. I have one slight sag in the paint where I shot a little to long, but at the advise of Mr. Holley I’m going to wait to knock it down until I have a little more paint on the guitar. I’m waiting to wet sand until I have the clear coat on, again at the advise of Mr. H.

I spent a little time planning the relic pattern for the body, I’m going to buff between layers of gouging to create layers of wear. I’m also hoping I can create a checked finish. I’m trying to improvise a high UV light source to help cure and “age” the finish before attempting checking with heat gun and compressed air propelant.

Here’s a sketch of the planned carnage:

Case Candy

I gave a long lab assignment today that kept my students in the zone, I had time to research some old fender advertising from the 50s and 60s. It inspired me to create a registration card for my relic. It sparked an interesting discussion on the role of research in design with my students.

The card is designed to fold in the center, the first image is the exterior and the second is the interior. I used text from several cool old fender advertisements I found at relicdeluxe.com. Here’s what I came up with.

Exterior text:
Another “first” from Franz. First again in the field of amplified music… the thrilling new TC-10 by Franz! Years ahead in design, unequaled in performance. Everything is new in this revolutionary instrument. Two separate pick-ups, special tone control and “comfort contoured” body design all mean there’s a new thrill in store when you play the Franz TC-10.

Interior text:
Franz TC-10 Guitar Perfection in a solid body comfort contoured professional guitar providing all of the finest features. Choice hardwood body finished in an array of contemporary colors. Maple neck with rosewood finger board, black pick guard and lustrous chrome metal parts. Two advanced style adjustable pick-ups, one volume and one tone control and a three position instant tone change switch. The adjustable Franz bridge insures perfect intonation and the softest action. The neck has the famous Franz truss rod. The TC-10 is available with or without the Franz built in tremolo. The brand-name Franz represents superior quality. That is why leading musicians prefer Franz fine electric instruments. See the complete Franz line at your leading music dealer and write for the latest catalog of Franz Electric Guitars, Amplifiers, Strings, and Accessories.

Here’s what I developed, its a work in progress. I’m going to use the exterior halftone pattern on the interior gold panels, I’ll also add images of hardware in the panels.