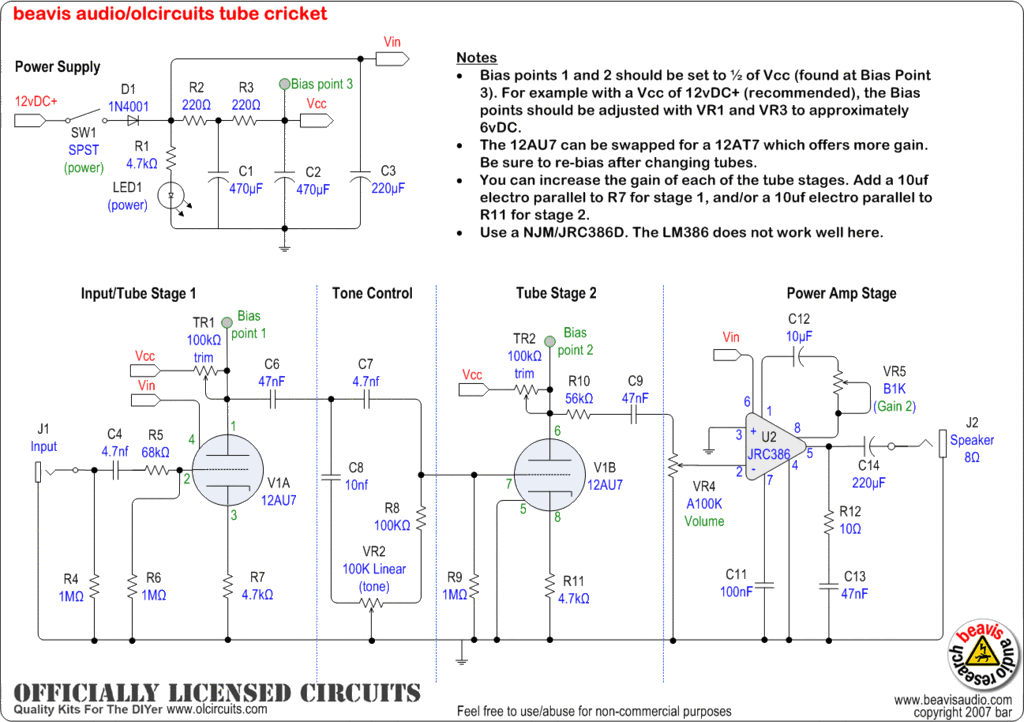
The Beavis tube cricket! 1.5 ish watts based on a 12AU7 and powered by a 12V ac adapter. I ordered a PCB as soon as I saw it.
UPDATE: I started this project with the intention of transplanting a pignose practice amp into this case. A whole new world of options has opened up since I started playing with tubes. I’m putting this one on hold until I find the perfect circuit for this cool combo.
![]()
Here’s my first attempt at toner transfer. The inkjet paper has several layers that need to soften in water and peel away from the surface leaving only toner and brass. I think I used too much heat and fused a thick plastic layer with the paper on the face of the page, this caused allot of the toner to pull off with the paper. I also might need to let the piece soak longer.
As long as I can keep the detail around the art I should be ok. I can manually retouch the edges with paint. I will try again today.
The process for the faceplate etching is complex, and as I was working I decided that I needed to kick the graphic side up a bit. I was inspired by the intaglio printing on a dollar bill and decided to try a vintage scroll type graphic for the art on the amp. Obviously its a breaking from the 1950s look, but who am i kidding? One of my next projects is going to build a tube amp from scratch. This style of graphic really has the right feel for what I have in mind for that project. I’m moving the input jack to the side of the amp for the sake of symmetry, this will also allow me to create another etched brass plate.

This is what the mask looks like, I placed the knobs and lamp for scale. The brass will be etched away in the white areas. The brass will then be primed and painted. Then I’ll sand the surface leaving the paint in the etched areas, a little tarnish and clear coat and it will be done!

This is the image I developed in photoshop.
I tried a toner transfer last night with no success, with more research I found that you need to use a very specific type of inkjet paper. It was on clearance from staples and will be arriving in a couple of days.
“If a cluttered desk is a sign of a cluttered mind, then what are we to think of an empty desk?” – Albert Einstein

Faceplate layout in progress..

I attached the grill cloth using hot melt glue. I had no idea how tough grill cloth is. I tried a new exacto and sharp scissors and both had a hard time cutting the fabric. I used a hot melt glue gun to attach the bottom edge and then gently stretched the fabric and glued the top edge. I repeated the process for the sides checking to make sure the tension was even across the face of the fabric. I made relief cuts for the corners and stretched and fitted before gluing. I was tempted to use staples but I’m afraid I’d go through or crack the grill.
I got my third can of krylon on the body and I’m going to let it sit for a week or so before I wet sand.
In the interim I have the amp to work on. I got my brass stock in the mail today – gotta love amazon prime. Pics below show the progress I’ve made. I’ve shaped the oak plywood for the grill and cut the speaker mount to fit the philco radio case.


Scraps from the web on tarnishing brass, this is what I found with a quick search. Nothing here has been tested.
1. Choose a glass container with lid of sufficient size to contain the item requiring aging. Find some cotton wool and soak in ammonia and place in bottom of jar. Suspend brass item in jar and attach top. Brass item will tarnish fairly rapidly say 20 minutes depending on room temperature. Remove from time to time to check amount of aging required, then remove and neutralize ammonia with clean water.
2. You will think i am a freak for this, but bury it in the kitty litter box for a couple of days. Then wash well.(!) It will give a really interesting oxidized effect. (obviously i have way too much time on my hands)
3. You can repatina brass and bronze depending on the look you are after, simply, and at little expense. I use a closed container, bucket & lid, or whatever comes closest to fitting around the brass item. Polish and clean off any hand prints with paint thinner, wear gloves at this point. Locate a small jar and lid, place in this 1/8 cup of ammonia. Do this out doors with a breeze at your back. Masks and gogles are a bennefit with ammonia, but no mask will seperate amonia from the air you are breathing, so be warned. Next put the brass item in the container, put the small jar inside, remove the lid from the jar and cover the bucket. A clear container works well here, or else look inside from time to time to see how things are doing. Goggles help the peeking. Keep track of the time if you wish to repeat, and replace the ammonia with the same amount of fresh ammonia each batch. Next I take a polishing cloth, clean and very soft, buff the edges for highlights, spray with brass lacquer, or spray shellac. Some hobby shops are selling metal ageing chemicels that can give assorted colors, so if the ammonia isn’t the darkening you want, try them too.
4. Salt and Vinegar
I’m very excited about creating the control plate for the amp. I posted on the telecaster.com forums and
I’m on my second can of krylon on the tele body and I’m getting ready to apply the headstock decal and start shooting clear coat on the neck.
Here’s a 10 minute 3D model of the amp mod:


I’m finding that the finishing work on the guitar requires allot of patience and I need another project to keep me busy so I don’t rush through the work and get sloppy.
I spent part of the weekend taking my grandfather-in-law to the Toledo Hamfest (Home and Mobile Radio, not honey baked) I’m not a ham, but I appreciate a good electronics themed flea market as much as the next guy. My mission was to find some hardware and a case to build a small amp to accompany the TC-10.
I got lucky and I found about everything I need to build a cool “vintage” looking amp – for $20!!!!
Here’s what I found:
philco radio with a great case $5.00 (haggled down from $10)
pignose hog 20 practice amp (not working until I replaced the fuse!) $10.00
3 bakelite knobs, vintage power switch and fuse holder $5.00
I cracked open the pignose, solved the fuse issue and found a suitable power supply. It came with a mismatched 15v laptop power brick. It sounds great for a ten dollar investment. I broke down the amp so it can be mounted in its new home. The hog 20 has the option of battery power and also has two 6v sealed lead acid batteries, I’m wondering if I can save weight and cost by using a NIMEM cells? A little research is in order.
Here are photos of the booty in all it’s vintage splendor:
Philco case, pignose speaker and guts, knobs, switch, fuse holder, and pixel the cat.
 Philco detail front
 Philco detail back, the case has an awesome hinge and latch system.
 hardware detail (click the image to view LARGE, the detail is great)

In addition to the amp stuff, I found a huge roll of copper foil $3, a shopping list of electronic components for other projects $40?, a trashed Victrola $10, a couple of cool vintage radios $20(decoration) and tron on laser disk $2(I’m a geek, I collect tron memorabilia)
I have a cool purple jewel lamp holder that I pulled from something a while ago that will look great on this project. I’ll have to find a suitable grill cloth and make a bezel of some sort, I think It will be a cool little amp when it’s finished.